Welcome to Lesson 1 of our journey to UNLOCK your story. yay!!!!
I am absolutely thrilled for everyone who is in this class and I love how excited all of you are to get started! :)
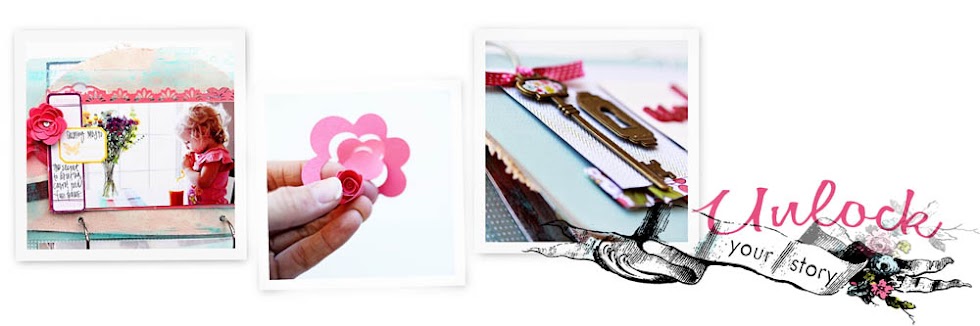
Today, we are going to design the cover of our album.
To view this video:
- Click on the play arrow below
- Or by clicking this link.

1. Take out your blue/green (Gracious Hare) floral paper & cut and adhere both sides to the chipboard tab page (front cover.) With the solid color on the back of the paper showing. I used modge podge (liquid adhesive) & a cutting knife. Feel free to do your favorite way to cover chipboard.
- Paint modge podge or your favorite liquid adhesive onto chipboard.
- Attach 6x9 piece of paper to chipboard. Let dry.
- Take exacto knife and cut off edges.
- Sand edges with sandpaper
- Paint edges with white paint to cover the chipboard
2. Cover both sides of the bracket shape chipboard page (back cover) with the blue polka dot paper same as step 1.
3. Take a 1"x12" piece of brocade/floral patten paper and fold to make ruffles. Add foam squares and attach to bottom or cover page.

4. Cut a 6"x 3.5" piece of green and white pattern paper (Charming Collin) with foam squares at the top and tape runner adhesive at bottom. Overlapping the brocade pattern a 1/4".
5. Paint your manilla tag with a white wash of white paint and set aside to dry.
6. Add the words "unlock your story" to the painted tag. Add brown ribbon stapled or tied to the end of tag. Attach the tag hanging off the right edge of the green/white chevron stripe paper about 1/2".
7. Tie a ribbon to key or use a glue dot to attach ribbon. Adhere key and key hole to the left side of the green/white chevron stripe paper with foam squares or glue dots.
KEEP IN MIND: Basic facts & questions about our class.
-All the lessons will be posted to this private class blog. I will send you each an email to let you know the lesson is posted.
-The blog will be up for as long as you need to finish your album. Up to several months.
-The lessons will be posted by 10:00 am mountain standard time on Weekdays. Monday-Friday. You can use the weekends to catch up on what you might have missed during the busy week. (I will send you an email to tell you when each new lesson is up.)
-If you are making your own album and did not buy a kit... I would suggest a front cover, back cover, 3 inner pages & 2 envelopes (A2 size.)
-The photos I used are everyday photos of us around our home & outside. This album is so versatile that you could use photos from anything. Family, friends, pets, etc.
-If you are missing anything from your kit... shoot me an email. (elizabeth.kartchner@gmail.com)
Feel free to ask any more questions you may have.
Homework: Finish your cover
Tomorrow: Start of our journaling.
I can't wait to do this. I am determined to keep up with a class for once!!
ReplyDeleteGotta hurry home tonight to make this cute cover!
Ohh man I love the end of the video! hahaha
ReplyDeleteHi Elizabeth,
ReplyDeletefor some reason I am not able to watch the video in Germany. It says there is content not to be seen in my country? Do you know what that could mean?
Thanks, Simea
I am going to get started asap. Love the end bit as well.
ReplyDeleteHi, Liz! I'd like to use some photos of me, but the best ones are vertical. Is it possible to change the direction of the album?
ReplyDeleteI am just so excited about this album! It is gorgeous! Now I just need some time! :)
ReplyDeleteOk time to go and get started!! This is so exciting I can't wait any longer!! Love the video :)
ReplyDeleteRenata,
ReplyDeleteDefinitely can be vertical!
de Simea
ReplyDeleteare you still able not to see it?
I will email it to you...
Great Lizzy!!, My cover its done.
ReplyDeleteI cant wait to tomorrow.
Thanks!!
Just finished my cover... love it!! Can't wait til tomorrow either. :)
ReplyDeleteGreat tutorial, thank you!
ReplyDeleteUm...how do you whitewash the tag?
Just thin out some paint and brush it over it I'm guessing?
I love how you're doing video and written instructions, it makes such a difference, thankyou!
ReplyDeleteMy cover is all done, can't wait for lesson 2!!!
Hi Elizabeth, I love the video, you make it look so easy, I cant wait to get started, thanks, Louise
ReplyDeleteI'm not starting till later this week, but I just had to watch the video. The ending was so funny. Thanks so much for adding it in there, it really keeps it so fun!
ReplyDeleteAhhhh... I've been looking forward to getting started all day.... now my workday is done and it's time for the fun to begin!
ReplyDeleteThis is the best class I have EVER done...off to get started..thanks so much Lizzy!x
ReplyDeletep.s LOL at the last bit...too funny!
Britney,
ReplyDeleteYou can either thin out the paint a little with water or I just use somewhat wet foam brush and a little bit of paint.
Email me if you have some more questions about this, k? :)
thanks!
YAY! So happy that you ladies are already finished with the cover. I am impressed!
ReplyDeleteliz
Cute! Can't wait to get started...but I have a final Thursday :( I vote that Collin does a video! You could totally charge extra for that. Excited for what Tuesday brings.
ReplyDeleteI am loving this soooo much. I still don't have my kit yet but thats okay. I am going to do this album for my daughter who turns 13 soon and I want to document her life right now.
ReplyDeletelove me.
Love it! I'm new to scrapbooking and I've been looking forward to this class!!
ReplyDeleteYay! I just finished it, so cute! Thanks Liz for the help on the white washing. I ended up using a dry brush and a little bit of paint. I think a wet brush would work lots better, thanks for the tip!
ReplyDeleteSee you all tomorrow!
The video is great! I still need to figure out what pictures to use :)
ReplyDeleteThat is a wonderful video! I am done with my cover, it was such fun making! I canned myself over Collin at the end of your video-he is such a card!!
ReplyDeleteI received my kit on 2 Nov and get to start making the cover. Tutorial is awesome. Simple and easy to understand. Love the song in the video and I had completed Lesson 1! thanks Lizzy.
ReplyDeleteI'd love this video, so many details I had never thinking about that make a difference... Thanks!
ReplyDeleteYAY finaly the kit arrived today, here in Singapore. I should start asap to catch up. Great video, love it.
ReplyDeleteCan you tell us what the song is for the video? It is lovely!
ReplyDeleteI loved making this cover and have got some great ideas for other mini books. Also I love Colin's comments at the end. =)
ReplyDelete